Uploading WordPress files such as images in subfolders or root directory will increase your site loading performance. Well that is the observation of many web developers. Which is true because browsers need not to dig deep directories such as yourdomain.com/wordpress/wp-content/uploads or if you install it in root directory you have yourdomain.com/wp-content/upload as container of your images or files.
Now here’s a way to simplify the media files directory. I will present two ways and make sure to read through before you’ll start the changes or setup.
Method 1. Uploading Images in root directory or sub-folder
You can upload all images or files in the root directory or subfolder but I prefer uploading those files in a subfolder to have a better segregation and organization of files. If you have have loaded your WordPress in a root directory, the tendency is to mixed up your php files with the images or media files.
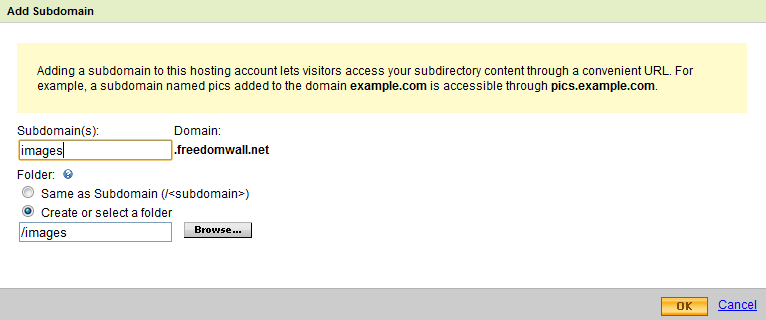
If you choose to upload your media files to a sub-folder, I recommend you to create a subdomain pointing to the said folder or directory. Say for example, create a subdomain, files.yourdomain.com and point it to yourdomain.com/files. Visit your hosting panel to create a subdomain. I am hosted with GoDaddy and the screenshot below shows my subdomain setup.
After setting up a subdomain, open WordPress DashBoard >> Settings >> Media
For subfolder directory uploads
- Fill Uploading Files >> Store uploads in this folder field with your absolute hosting path slash subfolder
- Fill Uploading Files >> Full URL path to files field with your subdomain pointing to the subfolder, say http://images.yourdomain.com
- Click Save Changes
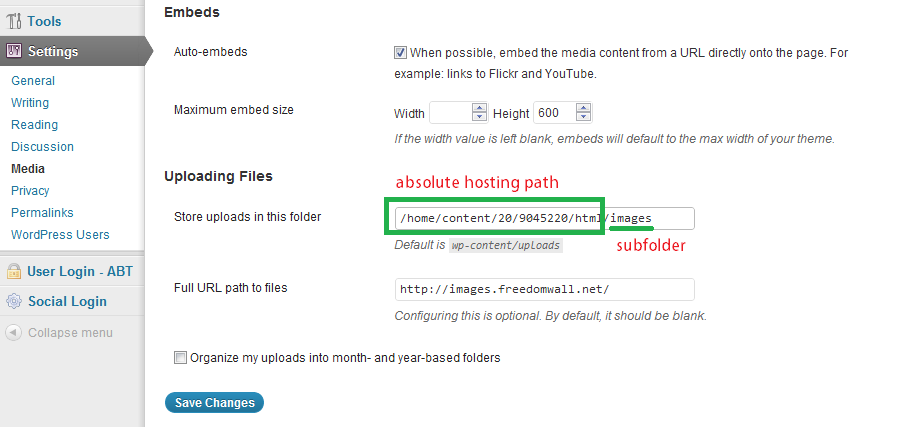
Also, you can tick Organize my uploads into month- and year-based folders if you want to organize your images by year and month. Doing this will make your images or media files URL longer. This will show http://images.yourdomain.com/year/month/file.doc instead of having a shorter http://images.yourdomain.com/file.doc
Please note that Method 1 will not update your previously uploaded images or files which means that this will retain the use of the old image link. I am sure that those will remain valid as long as you will not move your old images or files to your new image directory.
Method 2 – Uploading images on the same directory but uses subdomain
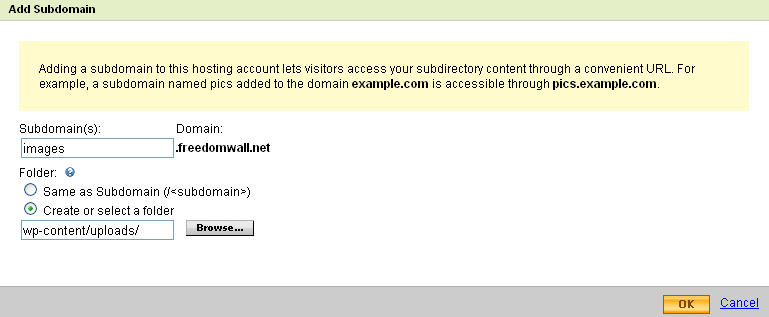
Yes it is possible. You can retain your image or media files directory at wp-content/uploads but using a subdomain. That means that you still upload images at www.yourdomain.com/wp-content/uploads but the image links will be images.yourdomain.com. For instance, I have the long https://freedomwall.net/files/madrid2.jpg but the link is shortened to http://images.freedomwall.net/madrid2.jpg. And yes, I can access the image using both links.
To link your images to your subdomain, visit your hosting panel and create a subdomain that points to wp-content/uploads.
Open your WordPress DashBoard >> Settings >> Media
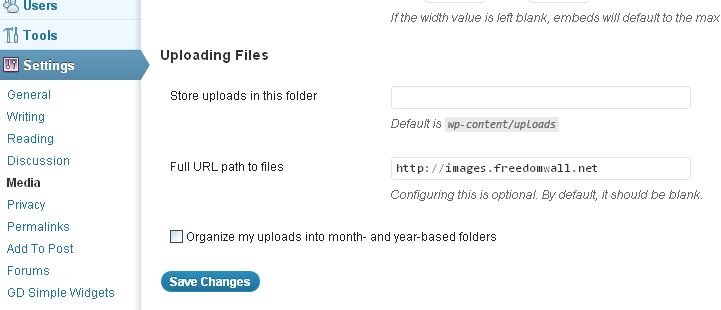
- Leave Uploading Files >> Store uploads in this folder empty, this will automatically use the default wp-content/uploads
- Fill Uploading Files >> Full URL path to files field with your subdomain, say http://images.yourdomain.com
- Click Save Changes
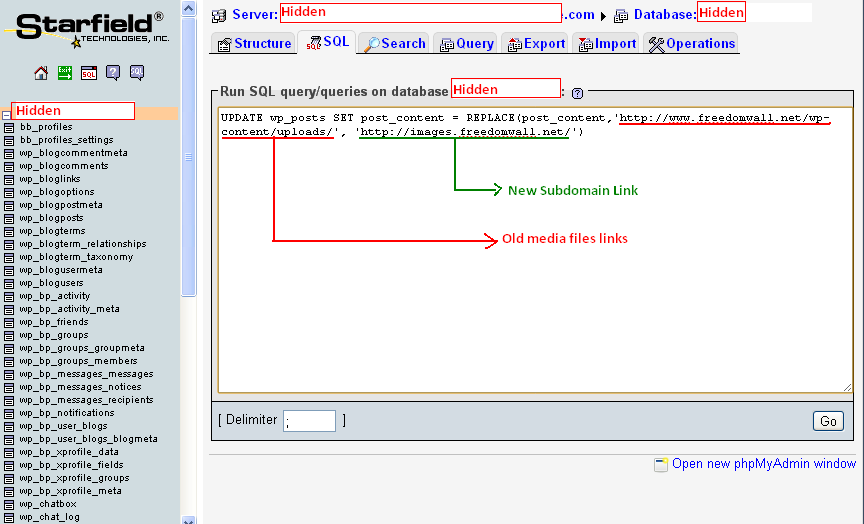
Then you are done. Unfortunately, your previous uploads will not be updated to the new links. To update your media files links in your previous posts or article, you should edit your database.
Using PHPMyAdmin, run the SQL query code below. Your PHPMyAdmin link will be access through your hosting panel.
Note: Backup your SQL database before editing. Also, make sure to replace the links with your own domain and chosen subdomain.
UPDATE wp_posts SET post_content = REPLACE(post_content,'http://www.yourdomain.com/wp-content/uploads/', 'http://images.yourdomain.com/')
I hope this will help.


Leave a reply