Before you begin, make sure that your Lexmark printer and your computer are connected to the same network. To connect your printer to your internet, you can use an ethernet cable. You can also connect the printer to your Wi-Fi router.
If internet or Wi-Fi is not available, then you have to connect your printer directly to your computer. You need a printer to computer USB cable for it. The printer to computer USB cable has USB 2.0 Type A Male connector (computer end) at one end and USB2.0 Type B Male connector (printer side) on the other. For smaller printer models, the USB cable is sold separately.
Connect the Printer to the Internet or Wi-Fi
The easiest way to connect your printer to your Wi-Fi is using the WPS Push Button method.
From the control panel, navigate to Settings > Network/Ports > Wireless > Wi-Fi Protected Setup > Start Push Button Method.
On your Wi-Fi Router, press the WPS button within 2 minutes. This process works all the time.
For more information, see the following video:
If under weird circumstances that the WPS button method does not work, you can use the Lexmark Mobile Assistant (LMA) method. The LMA is a mobile application that assists you in setting up your new printer or configuring its Wi-Fi connection. For more information on using the application, see the Lexmark HTV site.
Take note of the IP Address
Once your printer is connected to the internet, its IP address appears on the control panel display. Take note of that IP address. You will use it to access the Embedded Web Server and update your printer settings more conveniently.
For example, if you want to set up the scan to email feature, you can access the Embedded Web Server to configure the settings easily.
Add the printer to your computer
Next, you need to add the printer on your computer. But before you can ado that, you have to install the Lexmark Universal Print Driver first. It normally comes in the CD inside your printer box or package. You can also download the driver from the Lexmark support site.
From the computer, launch Printers & Scanners, and then click Add Device. Printers that are connected to your network appears on the list.
Scan to a computer using Windows Fax and Scan
Time needed: 2 minutes
On this stage, your printer must be connected to the network and is already added on your computer.
- From the computer, open Windows Fax and Scan
Windows Fax and Scan is native app for Windows 10. If the application is not available on your computer, you can download a copy from the Microsoft website.
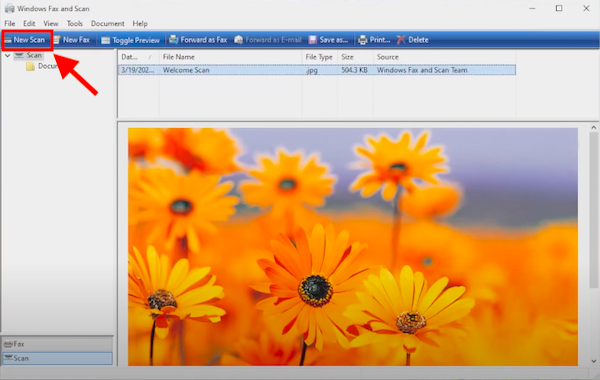
- On the upper-left corner of the display, click New Scan.
If no printer is added, clicking New Scan prompts and error.
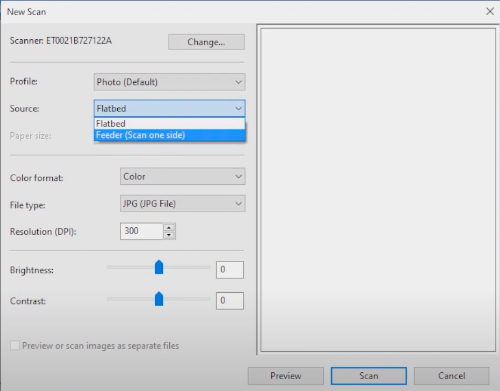
- From the Source menu, select the scanner source.
Depending on where you load the original document, select either Feeder or Flatbed.
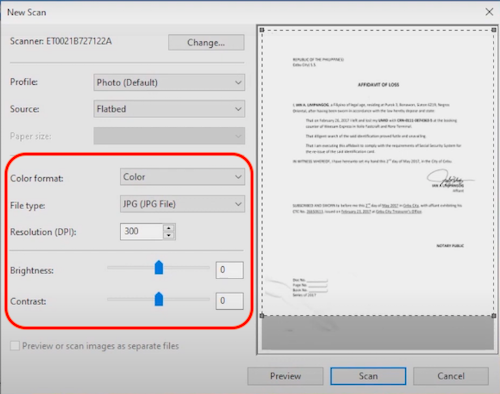
- If necessary, adjust the color format, file type, and resolution.
You can also adjust the bright and contrast. To preview the document, click Preview. The preview is only available if the original document is loaded on the flatbed scanner.
- Click Scan.
The scanned document is saved on the Scanned Document folder within your Documents folder.

You can also use the Lexmark Scanback Utility to scan documents and save them to your computer. Download the utility from the Lexmark support site.
Scan to a Macintosh Computer
- Launch System Preferences, and then Click Printers & Scanners.
- Add a printer. Printers that are connected to the network shows on the available printers list.
- Click Scan > Open Scanner.
- To view the scan settings, click Show Details.
- Select the scanner source, adjust the scan settings, and select where you want to save the scanned document.
- Click Scan.
If textual instructions don’t work for you, then watch the end-to-end how-to video on the header.


A wireless printer server and a good source of internet connection or WiFi are required to connect your Lexmark Printer to a wireless network or WiFi. This serves as a link between the router and the USB printer. The procedure is straightforward and straightforward; simply follow the simple steps to complete the connection.
Connect the USB cord to the wireless print server’s USB port on the back.
Connect the Ethernet cable to an open port on your wireless network router and plug it into the rear of the wireless print server.
Turn on the printer and wireless print server with your AC adaptor.
Now open the disc that came with the wireless print network on one of the connected PCs. You can also use the disc to install the necessary drivers and then follow the on-screen instructions to finish the process.