You recently acquired a new printer with scanning feature and you are excited to use its features. You tested the print, copy, fax, and scan features, and they all work well. That makes you happy. After some time of playing with your new gadget, you found out that it offers a lot more awesome features. Scan to email, for example. With the scan to e-mail feature, you scan a document, and then send it directly to someone’s e-mail address. Sounds cool, right? You also save time by doing so.
However, when you tested the feature, it did not work. That makes you sad. Don’t get disappointed immediately, though. You just need to configure the SMTP settings of your printer first before you can use the scan to email feature.
But before you begin, make sure that your printer is connected to the network. This step is important. In the end, you cannot send an email without the internet. You may hook your printer to your router using an ethernet cable or connect your printer to your Wi-Fi network.
Setting up scan to email
You can configure the email SMTP settings using the printer display or control panel or the Embedded Web Server (EWS). The process is basically the same, but in order to avoid typing errors, especially on typing complicated passwords, I will show you the EWS process.

Do the following:
1. Access the Embedded Web Server.
From your computer, open a web browser, and then type the printer IP address. You can view the printer IP address on the control panel display.
NOTE: The printer IP address shows only if the printer is connected to the network or Wi-Fi.
2. Navigate to the E-mail Setup settings.
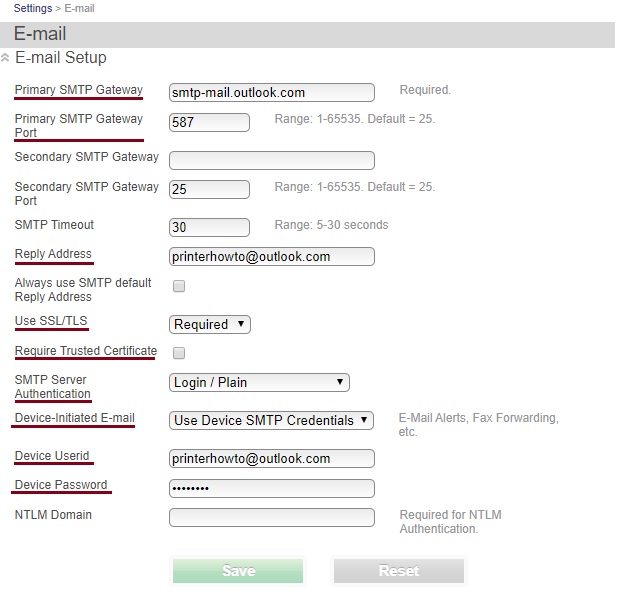
From the Embedded Web Server (EWS), click Settings > E-mail > E-mail Setup.
3. Configure the SMTP settings.
Time needed: 5 minutes.
Configure the e-mail SMTP server settings to use the scan to email feature of your printer.
- In the Primary SMTP Gateway field, type the outgoing SMTP server of your e-mail provider.
For example smtp.gmail.com.
- In the Primary SMTP Gateway Port field, type the outgoing SMTP port of your e-mail provider.
Most e-mail providers use 587.
- In the Reply Address field, type your e-mail address. For example, user@gmail.com.
This setting is optional but if you leave this empty, the scan e-mails will be considered junk or spam.
- From the Use SSL/TLS menu, select Required.
You can choose either Negotiate or Required.
- Uncheck or disable the Require Trusted Certificate setting.
- From the SMTP Server Authentication menu, select Login / Plain.
- From the Device-Initiated E-mail menu, select Use Device SMTP Credentials.
- In the Device Userid field, type your e-mail address.
For example, user@gmail.com.
- In the Device Password field, depending on your e-mail provider, type either your e-mail account password or app password.
For Gmail accounts without two-step verification, use Gmail password and enable access to less secure apps. Go to Google Accounts Security page. From the Less secure app access section, click Turn on access, and then enable Allow less secure apps.
For Gmail accounts with two-step verification, use App password. To create an app password, go to Google Accounts Security page, and then from the Signing in to Google section, click App Password. The app password has 16 characters.
For the SMTP server settings of other e-mail providers, see the succeeding section.
If visual tutorial works better for you, then view the following video:
SMTP Settings for different email providers
We have tested the following email providers using a Lexmark printer and we proved that the following settings work. Pay attention on the notes indicated in the Device Password row. Some email providers implement strict security features. You need to create a separate password for the outgoing SMTP settings. They call it app password.
Gmail or Google Suite
These SMTP server settings are applicable to both free and Google Suite users (paid users with custom domains).
| Primary SMTP Gateway | smtp.gmail.com |
| Primary SMTP Gateway Port | 587 |
| Reply Address | Your e-mail address |
| Use SSL/TLS | Required |
| Require Trusted Certificate | Unchecked or disabled |
| SMTP Server Authentication | Login / Plain |
| Device-Initiated E-mail | Use Device SMTP Credentials |
| Device Userid | Your e-mail address |
| Device Password | Your Gmail password or App password NOTES: For Gmail accounts with DISABLED 2-step verification, use Gmail password and enable access to less secure apps. Go to Google Accounts Security page. From the Less secure app access section, click Turn on access, and then enable Allow less secure apps. In some cases, Google disables the “Less secure app access” setting automatically when it notices a security issue on your account. When that happens, the scan to email feature fails. I suggest that you enable the 2-step verification on your account, and then generate an app password. For Gmail accounts with ENABLED 2-step verification, use App password. To create an app password, go to Google Accounts Security page, and then from the Signing in to Google section, click App Password. The app password has 16 characters. |
Outlook or Hotmail
These settings are applicable to all @outlook.com and its respective country TLDs, @hotmail.com, and custom email domains that are hosted at outlook.live.com.
| Primary SMTP Gateway | smtp-mail.outlook.com or |
| Primary SMTP Gateway Port | 587 |
| Reply Address | Your e-mail address |
| Use SSL/TLS | Required |
| Require Trusted Certificate | Unchecked or disabled |
| SMTP Server Authentication | Login / Plain |
| Device-Initiated E-mail | Use Device SMTP Credentials |
| Device Userid | Your e-mail address |
| Device Password | Your account password or app password NOTES: For accounts with DISABLED 2-step verification, use your account password. For accounts with ENABLED 2-step verification, use app password. To create an app password, got to https://account.live.com/proofs/Manage/, and then from the App Passwords section, click Create a new app password. |
Yahoo! Mail
These settings are applicable to @yahoo.com, @ymail.com, and all Yahoo mail country TLDs.
| Primary SMTP Gateway | smtp.mail.yahoo.com |
| Primary SMTP Gateway Port | 587 |
| Reply Address | Your e-mail address |
| Use SSL/TLS | Required |
| Require Trusted Certificate | Unchecked or disabled |
| SMTP Server Authentication | Login / Plain |
| Device-Initiated E-mail | Use Device SMTP Credentials |
| Device Userid | Your e-mail address |
| Device Password | App password For example, hgbbhgttbhgdmnhv (16 characters).NOTE: To create an app password, go to the Yahoo! Account Security page, and then click Generate App Password. |
iCloud Mail
To use the outgoing server of your iCloud Mail, make sure that two-factor authentication is enabled. Do not use your AppleID email address that is hosted on a different e-mail provider.
| Primary SMTP Gateway | smtp.mail.me.com |
| Primary SMTP Gateway Port | 587 |
| Reply Address | Your e-mail address |
| Use SSL/TLS | Required |
| Require Trusted Certificate | Unchecked or disabled |
| SMTP Server Authentication | Login / Plain |
| Device-Initiated E-mail | Use Device SMTP Credentials |
| Device Userid | Your e-mail address |
| Device Password | App password For example, xdbb-dkcn-dhhr-kdjn (20 characters, including hyphens)NOTE: To create an app password, go to your iCloud Account Management page, and then from the Security section, click Generate Password. |
AOL Mail
| Primary SMTP Gateway | smtp.aol.com |
| Primary SMTP Gateway Port | 587 |
| Reply Address | Your e-mail address |
| Use SSL/TLS | Required |
| Require Trusted Certificate | Unchecked or disabled |
| SMTP Server Authentication | Login / Plain |
| Device-Initiated E-mail | Use Device SMTP Credentials |
| Device Userid | Your e-mail address |
| Device Password | App password For example, hgbbhgttbhgdmnhv (16 characters).NOTE: To create an app password, go to the AOL Account Security page, and then click Generate App Password. |
Mail.com
These SMTP server settings are applicable to all Mail.com domains. For more information, go to https://www.mail.com/email.
| Primary SMTP Gateway | smtp.mail.com |
| Primary SMTP Gateway Port | 587 |
| Reply Address | Your e-mail address |
| Use SSL/TLS | Required |
| Require Trusted Certificate | Unchecked or disabled |
| SMTP Server Authentication | Login / Plain |
| Device-Initiated E-mail | Use Device SMTP Credentials |
| Device Userid | Your e-mail address |
| Device Password | Your Mail.com account password |
Zoho Mail
These settings are applicable to @zohomail.com and all Zoho mail custom domains.
| Primary SMTP Gateway | smtp.zoho.com |
| Primary SMTP Gateway Port | 587 |
| Reply Address | Your e-mail address |
| Use SSL/TLS | Required |
| Require Trusted Certificate | Unchecked or disabled |
| SMTP Server Authentication | Login / Plain |
| Device-Initiated E-mail | Use Device SMTP Credentials |
| Device Userid | Your e-mail address |
| Device Password | Your Zoho mail account password or app password NOTES: For accounts with DISABLED 2-step verification, you can use either your account password or app password. For accounts with ENABLED 2-step verification, use app password. To create an app password, go to the Zoho Mail Accounts Security page, and then from the Application-Specific Passwords section, click Generate New Password. For example, mtaP2EfZj9we (12 characters) |
If your email provider is not listed, please let us know using the comment form below so we can test them. We will inform you and add the SMTP information here once the test is successful.
If you want to scan a document and save it to your computer, see the scan to computer instructions.


The article is a fantastic resource for those looking to streamline their scanning process. The step-by-step instructions are easy to follow and the screenshots provide a visual aid to ensure accuracy. The author’s attention to detail and clear communication make this a must-read for anyone looking to improve their office productivity.
A reliable and highly-rated SMTP provider for scan to email is SMTP2GO – https://www.smtp2go.com/.
Forever Free plan offering 1,000 emails per month (paid plans available for more volume and features).
Simple setup within minutes.
24/7 support via phone, email ticket or live chat.
Full insight and tracking into all emails sent via real-time reporting and metrics.
Delivered via IPs with the highest sending reputation.
Hi,
Thanks for sharing this information with us . It is really good. If you are facing issues while setting up mail, then visit Email Setup to get resolutions to all mail configuration details.